

Essential Balsa Airplane Building Tools for Beginners
The first balsa airplane I tried to build taught me two things fast: balsa cuts like butter, and butter can still look terrible if the knife is dull.
I had plans, enthusiasm, and the kind of confidence that usually appears right before a crooked fuselage. What I didn’t have was a sensible beginner toolbox. I thought model building required a miniature machine shop, a laser cutter, and maybe a tiny wizard who aligned wing ribs while I slept.
Good news: it doesn’t.
For simple balsa designs, the best toolbox is small, sharp, square, and easy to understand. You can build a lot of airplanes with a handful of basic tools, especially if you start with straightforward plans. Advanced tools can come later, after you’ve glued enough pieces to your fingers to earn them.
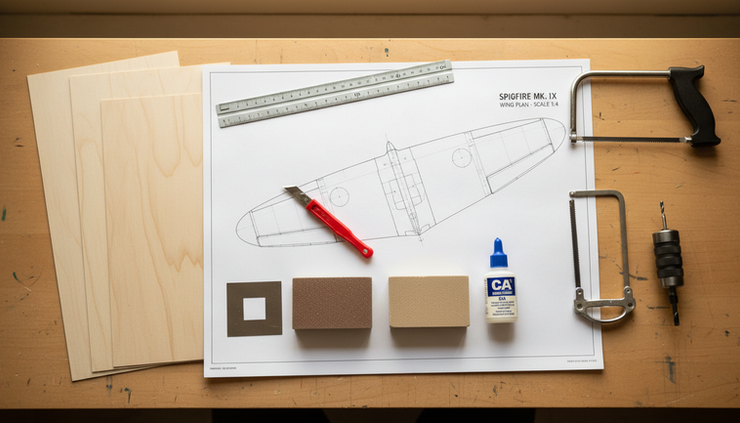
This guide walks through the core tools that actually matter when you’re building balsa airplanes from scratch. Nothing fancy. Nothing that needs its own dramatic unboxing video. Just the stuff that helps you cut accurately, sand cleanly, keep parts aligned, and turn flat sheets of balsa into something that looks like it wants to fly.
Start simple because simple airplanes teach better
A beginner-friendly balsa airplane doesn’t need complicated curves, retractable landing gear, or a fuselage that looks like it was designed by a committee of angry geometry teachers. Simple designs are better teachers.
A flat-bottom wing, box fuselage, and basic tail feathers will teach the same core skills you’ll use later on more advanced builds:
Cutting parts cleanly
Sanding matching shapes
Keeping joints square
Choosing the right glue for the job
Drilling holes without splitting thin wood
Cutting plywood parts without chewing them up
That’s why the beginner toolbox should match the beginner airplane. If the design is simple, the tools should be simple too. A new builder with a sharp knife, metal ruler, sanding block, and square will usually make more progress than someone surrounded by expensive gadgets they barely know how to use.
There’s also less pressure. If all you need is a clean knife cut and a flat sanding pass, the work feels possible. If your shop looks like a NASA subcontractor moved into the spare room, every mistake starts to feel expensive.
Simple tools also teach touch. Balsa is light wood, often used in model aviation because it has an excellent strength-to-weight ratio. That’s the whole magic trick. A finished model can be light enough to fly well, but strong enough to handle normal loads if the grain direction, glue joints, and structure are right.
You learn those details with your hands. You feel when a blade is dragging. You feel when a sanding block is rocking. You notice when CA glue grabs faster than you expected, usually one second after you decide to adjust the part.
That experience is worth more than the fanciest jig in the room.
The X-Acto knife is your main building tool
If balsa building had a superhero, it would be the hobby knife. Not the flashy one with a cape. More like the practical superhero who shows up with a sharp #11 blade and quietly saves the day.
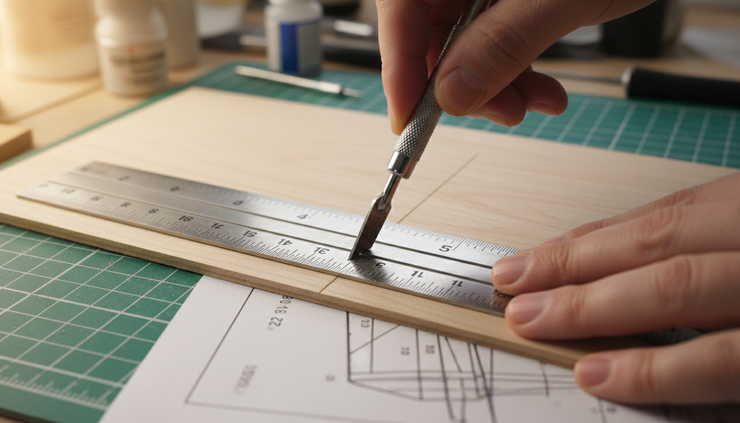
An X-Acto knife with a #11 blade and holder belongs at the center of the beginner toolbox. The #11 blade has a fine point and a long cutting edge, which makes it useful for cutting sheet balsa, trimming notches, opening slots, and shaving tiny bits from parts that almost fit.
And “almost fit” is a major phase of airplane building.
Why the 11 blade matters
A sharp #11 blade gives control. It can score lightly along a line, then deepen the cut in several passes. That’s much cleaner than trying to force the blade through the wood in one heroic jab.
Most thin balsa cuts better with multiple light passes. The blade stays on line, the wood fibers don’t crush as much, and the part is less likely to split.
Use it for:
Cutting ribs, tail surfaces, and fuselage sides from sheet balsa
Trimming sticks to length
Cleaning slots for ribs, spars, and formers
Shaving small adjustments before final sanding
Removing tiny glue bumps if you catch them early
Why the holder matters too
The blade holder is not just a handle. It gives grip, control, and safer pressure. A blade held in your fingers is a bad plan with excellent odds of becoming an exciting story.
Choose a standard metal hobby knife handle that holds #11 blades securely. Tighten the collar so the blade doesn’t wiggle. If it wiggles, it will wander. If it wanders, it will find either your part or your thumb. Neither signed up for that.
Keep blades sharp and change them early
A dull blade is dangerous because it needs extra force. Extra force leads to slips, crushed balsa, and dramatic muttering.
Balsa is soft, but it can still dull a blade faster than expected, especially if you cut over printed plans, glue spots, or plywood. Change blades when cuts start feeling fuzzy or you notice the wood dragging instead of slicing.
A good habit:
Score the line lightly.
Make a second pass with gentle pressure.
Finish with a final pass if needed.
Let the blade do the work.
If the knife sounds like it’s plowing a field, stop and swap the blade.
A metal ruler keeps your cuts straight and your fingers safer
Wooden rulers are fine for school projects. Plastic rulers are fine until a blade shaves them into modern art. For balsa airplanes, use a metal ruler.
The metal edge gives the knife something firm to follow. It doesn’t nick easily, it stays straight, and it won’t slowly shrink in width as you accidentally slice pieces off it.
A 12-inch ruler handles most small parts. An 18-inch or 24-inch ruler helps with longer fuselage sides, wing spars, and trailing edges. If you can only start with one, a 12-inch stainless steel ruler is a good first pick.
What to look for
A good metal ruler doesn’t need to be fancy. Helpful features include:
Clear etched markings
A cork or non-slip backing
A thin edge for accurate alignment
Enough weight to stay put while cutting
The cork backing is especially nice because it raises the ruler slightly off the wood. That gives your fingers a bit more clearance from the blade and helps the ruler grip the surface.
Use the ruler like a cutting fence
Don’t just lay the ruler near the line. Set it exactly where the blade should ride, press down firmly, and keep your fingers away from the cutting edge.
When cutting long strips, make several gentle passes. Trying to slice through a 24-inch strip in one pass is how you invent the banana-shaped longeron.
And yes, every model builder has produced at least one banana-shaped longeron. It’s practically a membership card.
Sanding blocks make parts fit like they meant to
Sanding by hand without a block seems harmless at first. Then one day you hold two wing ribs together and realize you’ve invented a new airfoil called “the potato.”
A sanding block keeps surfaces flat, edges straight, and matching parts consistent. It spreads pressure across the sandpaper so you don’t dig grooves with your fingers.
For balsa airplanes, sanding blocks do a lot:
Square the ends of sticks
Shape leading and trailing edges
Match wing ribs
Smooth laser-cut or knife-cut edges
Flatten joints before gluing
Taper tail surfaces
You’ll use sanding blocks constantly, sometimes more than the knife.
Wooden sanding blocks are cheap and easy to make
A wooden sanding block can be as simple as a flat scrap of hardwood, plywood, or straight pine with sandpaper wrapped around it. That’s it. No ceremony required.
Wooden blocks work well because they’re light, comfortable, and easy to make in different sizes. I keep a few around:
A long block for wing edges and fuselage sides
A small block for tail surfaces
A narrow block for notches and tight spots
A tiny block that looks useless until it becomes the hero of the build
You can attach sandpaper with spray adhesive, double-sided tape, or clips. For a beginner, even wrapping the paper tightly and holding it works.
Use coarser grits for shaping and finer grits for finishing. Don’t get carried away. Balsa disappears fast under sandpaper. One minute you’re correcting a fit, the next minute you’re holding a toothpick and wondering where the stabilizer went.
Aluminum sanding blocks stay flat and last a long time
An aluminum sanding block is the more precise cousin. It stays flat, resists warping, and often has a comfortable machined shape. Some use adhesive-backed sandpaper rolls, which makes changing grit simple.
Aluminum blocks are great for:
Squaring bulkhead edges
Smoothing plywood parts
Trueing long balsa strips
Leveling joints where accuracy matters
You don’t need one on day one, but it’s a very useful upgrade that still counts as a basic hand tool. If the budget allows, get both a simple wooden block and a small aluminum block. The wooden block handles most light shaping. The aluminum block gives you clean, repeatable flatness.
Sand parts as pairs when they need to match
Here’s a beginner trick that saves a lot of grief. If two parts should be identical, such as left and right fuselage sides or matching stabilizer tips, lightly tack them together or hold them together and sand them at the same time.
That way, even if your cut was a little off, the finished parts match each other. Airplanes like symmetry. They don’t demand perfection, but they do appreciate when the left side and right side have at least met before the maiden flight.
CA glue makes building fast, but it rewards patience
Cyanoacrylate glue, usually called CA glue, is the go-to adhesive for many balsa builders because it bonds quickly and works well with porous materials like balsa. Thin CA can wick into joints by capillary action, which means it flows into tiny gaps. Medium CA gives a little more working time and gap filling.
If you’ve ever glued your fingers together with “super glue,” you’ve already met CA. It’s powerful, fast, and slightly mischievous.
Thin CA is for tight joints
Thin CA works best when parts already fit well. Hold the parts in place, touch a small drop to the joint, and let it wick in. The glue travels along the seam and grabs quickly.
Use thin CA for:
Rib to spar joints
Stick framework
Small balsa joints that fit tightly
Reinforcing a joint after dry fitting
The key is “small drop.” A lake of CA doesn’t make the airplane stronger. It makes it heavier, messier, and more likely to turn your workbench into a permanent sculpture.
Medium CA is more forgiving
Medium CA is thicker. It stays where you put it and gives you a bit more time to align parts. It’s useful when joints are not perfect or when you’re bonding slightly larger surfaces.
Use medium CA for:
Fuselage box joints
Small plywood to balsa joints
Landing gear plates
Areas where thin CA would run somewhere annoying
CA cures in the presence of trace moisture, which is why it often sets fast on fingers. Skin has plenty of moisture. Convenient for chemistry, rude for hobbies.
Use ventilation and protect the plan
CA fumes can irritate eyes and noses, especially in a small room. Work with ventilation, keep your face away from the joint, and avoid leaning over fresh glue like you’re trying to smell a campfire.
Also protect your building plan. Wax paper or clear plastic film over the plan keeps glue from bonding your airplane to the paper. That sounds obvious until you forget once. Peeling paper off the bottom of a wing is one of those character-building moments nobody asked for.
A good beginner glue setup includes:
Thin CA
Medium CA
Spare tips or nozzles
Wax paper or clear plan covering
Paper towel
Debonder if you want a safety net
You can add wood glue, epoxy, and specialty adhesives later. For many first balsa builds, CA will carry the project.

A square prevents the slow creep of crookedness
Crooked airplane parts rarely happen all at once. They sneak in. One former leans a little. One rib tilts a little. One tail surface sets at a cheerful but wrong angle. By the end, the airplane looks like it heard a scary noise.
A square helps stop that early.
Use a small machinist square, engineer’s square, drafting triangle, or hobby square to check 90-degree joints. It’s one of the most boring tools in the box, which also makes it one of the most powerful. The square doesn’t care about your hopes. It simply tells the truth.
Where a square helps most
Use a square when installing:
Fuselage formers
Wing ribs
Tail posts
Fin and rudder parts
Landing gear blocks
Servo trays or plywood plates if you’re building radio control
Place the square against the building board and the vertical part. Adjust before the glue sets. This is much easier than correcting a crooked structure later with sanding, shims, and bargaining.
The expired debit card trick
For tight spaces, an expired debit card or gift card makes a surprisingly useful mini square. The corners are usually close enough to 90 degrees for many small model-building tasks, and the thin plastic can fit where a metal square won’t.
Cut one down if needed. Use it to check small ribs, gussets, and formers inside a narrow fuselage.
Just make sure it’s expired. Using an active card in the shop is risky, not because of the glue, but because hobby tools have a way of convincing you to buy more hobby tools.
The card trick also works as a glue spreader, shim, or tiny scraper. It’s not glamorous. It is useful. Useful wins.
Saws handle jobs a knife should not
A sharp hobby knife is wonderful, but it has limits. Forcing it through plywood is one of the fastest ways to dull the blade, split the wood, or create a part with edges that look gnawed.
For plywood bulkheads, thicker balsa blocks, and tougher cuts, bring in saws.
Two beginner-friendly saws cover a lot of ground:
A razor saw
A coping saw
They serve different roles, and both earn their keep.
A razor saw makes clean straight cuts
A razor saw has a thin blade with fine teeth. It removes less material than a big shop saw and gives cleaner cuts in small stock. That thin cut, called the kerf, matters in model building because parts are small. Remove too much material and the fit changes.
Use a razor saw for:
Cutting balsa sticks square
Trimming spars
Cutting small plywood tabs
Making clean notches
Cutting dowels or small hardwood pieces
Pair it with a small miter box if you want super clean 90-degree or 45-degree cuts. That’s handy for stick-built fuselages and tail structures.
Let the saw do the cutting. Short, light strokes work better than pressing hard. Pressing hard flexes thin stock and can tear the fibers.
A coping saw cuts plywood bulkheads
Plywood bulkheads are stronger than balsa formers, and many scratch-built designs use them where loads are higher. The firewall is a common example on powered models. Landing gear mounts and wing saddle supports may also use plywood.
A coping saw works well for cutting plywood bulkheads because it can handle curves and inside cuts. The narrow blade turns more easily than a straight saw blade.
The usual process looks like this:
Transfer the bulkhead shape to plywood.
Cut slightly outside the line with the coping saw.
Sand back to the line with a sanding block.
Test fit in the fuselage.
Adjust slowly.
That “cut outside the line” step is important. The saw roughs out the shape. The sanding block makes it accurate. Expecting the saw to produce the final edge is like expecting a raccoon to fold laundry. Technically possible in a cartoon, not a shop plan.
Secure the work before sawing
Clamp plywood or hold it firmly against a bench hook or scrap board. Thin plywood can chatter if it’s unsupported. Chatter makes rough cuts and can break small tabs.
If the part is tiny, leave extra material around it while cutting. Sand it to final shape later. Small parts are easier to control before they become small parts.

A drill does more than make holes
A drill may sound obvious, but it deserves a spot in the beginner toolbox because model airplanes need clean holes in awkward places.
You might use a drill for:
Wing dowel holes
Landing gear wire holes
Pushrod exits
Control horn mounting holes
Servo screw pilot holes
Lightening holes in plywood parts
Starting holes for coping saw inside cuts
Alignment holes through matching parts
A small hand drill, pin vise, or lightweight cordless drill can all work. For delicate balsa, a pin vise gives the most control. For plywood bulkheads and larger holes, a cordless drill is convenient.
Pilot holes prevent splitting
Thin wood splits when screws force their way in without a pilot hole. Drilling a small pilot hole first gives the screw a path and reduces stress on the wood.
This matters for servo rails, control horns, landing gear plates, and small plywood mounts. Even if the part looks strong, it’s still small. Tiny parts do not enjoy brute force.
Drill slowly in balsa
Balsa drills easily, sometimes too easily. A fast bit can tear the back side of a hole. Support the wood with scrap underneath and use light pressure.
For cleaner holes:
Mark the center with a pencil or fine awl.
Back up the part with scrap wood.
Drill straight and slow.
Let the bit clear chips.
Sand fuzz lightly after drilling.
For bigger round openings, drill a starter hole first, then open the shape with a blade, file, or sandpaper wrapped around a dowel.
A drill also helps with alignment
If left and right fuselage sides need matching holes, tape the two sides together and drill both at once. That gives you matching holes without measuring twice and hoping your pencil didn’t go rogue.
For wing dowels, landing gear blocks, and control linkages, alignment matters. A hole that’s a little off can create stress or binding. Drilling carefully now saves a lot of “why is this fighting me?” later.
The beginner toolbox that covers most scratch builds
Your first toolbox does not need to fill a rolling cabinet. A shoebox-sized kit can build a surprising number of balsa airplanes.
Here’s a practical starter setup.
Tool | Why it matters | Beginner tip |
X-Acto knife with #11 blade and holder | Makes accurate cuts in sheet balsa and trims small parts | Use several light passes instead of one heavy cut |
Spare #11 blades | Sharp blades cut cleaner and safer | Change blades as soon as the cut feels fuzzy |
Metal ruler | Guides straight cuts and resists knife damage | Choose one with a non-slip backing if possible |
Wooden sanding block | Keeps sanding flat and controlled | Make several sizes from scrap wood |
Aluminum sanding block | Gives very flat, consistent sanding | Use it for edges and plywood parts |
Thin CA glue | Wicks into tight balsa joints | Dry fit first, then add a tiny drop |
Medium CA glue | Gives more control and fills small gaps | Use sparingly to avoid extra weight |
Square | Keeps ribs, formers, and tail parts at 90 degrees | Check alignment before every glued joint sets |
Expired debit card | Works as a tiny square or glue spreader in tight areas | Trim it smaller for cramped fuselage spaces |
Razor saw | Cuts sticks, dowels, and small plywood cleanly | Let the teeth cut without heavy pressure |
Coping saw | Cuts plywood bulkheads and curves | Cut outside the line, then sand to shape |
Drill or pin vise | Makes clean holes for hardware and alignment | Back up thin parts with scrap wood |
Add a flat building board and pins or weights, and you’re ready for a lot of classic balsa work. Some builders use ceiling tile, drywall, or a purpose-made building board under the plans so they can pin parts down. The main requirement is simple: it must be flat.
Flat is not negotiable. If the building board is twisted, the airplane will learn that twist like a family recipe.
What you can skip for now
This part may save money, space, and a little sanity. You do not need every tool that shows up in advanced build threads.
For a first scratch build, you can usually wait on:
Belt sanders
Disc sanders
Scroll saws
Laser cutters
Airbrush systems
Vacuum forming gear
Precision incidence meters
Large drill presses
Elaborate building jigs
Those tools are useful. Some are wonderful. None of them need to be in the room when you’re learning to cut balsa straight and glue a square fuselage.
The risk with advanced tools is that they can hide the basic skill you need to learn. A power sander removes material fast, but it also removes mistakes fast, along with the part you meant to keep. A laser cutter makes beautiful parts, but it won’t teach you how to true up a rib by hand.
Start with basic tools and simple designs. Build a chuck glider, rubber-powered model, small free-flight design, or simple radio-control trainer. After a few projects, the tools you need next will become obvious. You won’t be guessing. You’ll know because you’ll have said, “I wish I had a better way to do this,” at least three times.
That’s the correct time to buy the better tool.
How each tool fits into the build
It helps to picture the actual flow of a basic balsa airplane build. The tools aren’t separate little islands. They work together.
Preparing parts
The knife and metal ruler handle sheet parts and straight strips. The razor saw cuts sticks and dowels. The coping saw roughs out plywood bulkheads. The drill makes any needed holes before assembly.
This is where patience pays off. Cut parts slightly proud when needed, then sand to the line. Rushing part prep usually leads to gaps later.
Fitting parts
Sanding blocks do the quiet work here. They square ends, match pairs, and fine-tune joints. A good joint should fit without being forced. If you need to clamp it like you’re closing an overstuffed suitcase, fix the fit first.
Balsa structures are strongest when parts meet cleanly. Glue works better when it has actual surface contact.
Assembling the structure
The square becomes the supervisor. Ribs stay vertical. Formers stay upright. Tail surfaces line up with the fuselage. CA glue locks everything down once fit and alignment look right.
This is the stage where I learned to dry fit everything before opening glue. CA is fast. It’s also not interested in your second thoughts.
Cleaning up
After assembly, sanding blocks smooth joints and shape edges. The knife trims small bumps. The drill opens holes that were covered or need final sizing.
This cleanup stage can make a beginner build look much sharper. You don’t need perfect cuts if you leave yourself a tiny bit of material and sand carefully to the final shape.
A few habits that make beginner builds go better
The tools matter, but habits matter just as much. Good habits make cheap tools feel better. Bad habits make expensive tools file complaints.
Dry fit before gluing
Put the parts together without glue first. Check the fit. Check the square. Check the plan. Then glue.
This one habit prevents so many problems that it deserves a tiny trophy.
Cut away from yourself
Basic safety, yes, but also basic control. A cut that slips away from you is far less exciting than one that slips toward your hand.
Use a cutting mat or scrap board under the work. Don’t cut directly on the kitchen table unless you enjoy explaining modern art to everyone who eats there.
Keep the work area boring
A cluttered bench hides blades, pins, and small parts. That’s a thrilling combination in the worst way.
Keep only the current tools nearby. Put used blades in a safe container. Cap glue when you’re not using it. Balsa builds produce enough chaos on their own. They don’t need backup dancers.
Label similar parts
Left and right parts can look identical until one has a tiny notch in a different place. Mark them lightly with pencil. Pencil sands off easily and saves confusion.
Stop before fixing tired mistakes
Late-night building is fun until you glue the fin on backward. If you’re tired, stop. The airplane will wait. It has nowhere to go yet.
Advanced tools can wait, and that’s good news
One of the best things about balsa airplanes is that they reward simple craftsmanship. A clean, light model built with basic tools can fly beautifully. A heavy, crooked model built with expensive tools will still fly like a confused sandwich.
The beginner stage is where you learn the feel of the material. You learn how little pressure a knife needs. You learn how fast sandpaper changes a part. You learn that CA glue is best applied in drops, not emotional outbursts.
Later, sure, add tools. A small drill press can help with square holes. A scroll saw can speed up plywood parts. A magnetic building board can make alignment easier. A precision sanding jig can help with repetitive parts.
But none of those replace the starter tools. They build on them.
I still reach for the same basics all the time: knife, ruler, sanding block, square, glue. The fancy stuff comes out when the job calls for it. The simple tools never really leave the bench.

Build the first one with what you have
A beginner balsa airplane toolbox should help you build, not intimidate you into reorganizing the garage for six weekends.
Start with the essentials:
A sharp X-Acto knife with #11 blades
A metal ruler
Wooden and aluminum sanding blocks
Thin and medium CA glue
A square, plus an expired card for tight spots
A razor saw and coping saw
A drill or pin vise
That’s enough to cut parts, shape them, align them, glue them, and solve the normal little problems that show up on a scratch build.
Pick a simple design. Cover the plan. Cut slowly. Sand to fit. Check square before glue. Laugh when something goes weird, because something will. That’s part of the deal.
The first airplane doesn’t need to be perfect. It needs to teach you. If it comes out straight enough, light enough, and recognizable as an airplane rather than a decorative breadstick, you’re doing great.
Advanced tools can come later. For now, a small toolbox, a simple plan, and a little patience are more than enough to get balsa dust on your sleeves and an airplane on the bench.


Comments